Table of Contents Getting Started... Recording...11 Playing Back...14
|
|
|
- Claud Franklin
- 10 years ago
- Views:
Transcription
1 USER GUIDE
2 Table of Contents Getting Started...4 Main Window Essentials...5 Operation Modes...7 Setup...8 Recording...11 Tracks > Track Names > Adding Tracks > Master Bus > Track Controls Monitoring a Recording Starting a Recording Playing Back...14 Rulers > Markers > Enabling a Marker for MIDI Program Changes Main Window Tools Mixer Inspector

3 Controls and Menus...20 Session Window Preferences Window > Tracks Preferences: Audio System Settings > Tracks Preferences: MIDI System Settings > Tracks Preferences: Session Settings > Tracks Preferences: Preferences Main Window > Transport Panel > Top Bar > Tools > Regions Menus > System Status Indicators > Information Page Meter Section... 32

4 GETTING STARTED Tracks Live is a unique multitrack sound recorder, designed from the ground up to meet the specific needs of live sound engineers. It combines rock-solid operation with an intuitive workflow. It s quick to set up, simple to use, and very flexible. Tracks Live does all the things you d expect of a multitrack recorder, so if you re familiar with recorders, you can probably install the software, launch the application, and get to work. You shouldn t run into problems. Tracks Live also has a few features that go beyond what you usually see in a recorder. Some of these features aren t obvious when you first open the application, so please consult this user guide in order to learn more about them. To get the most out of Waves Tracks Live, we suggest that you also become familiar with the Waves support site: There you will find an extensive answer base, software updates, and current information about licensing and registration. 4

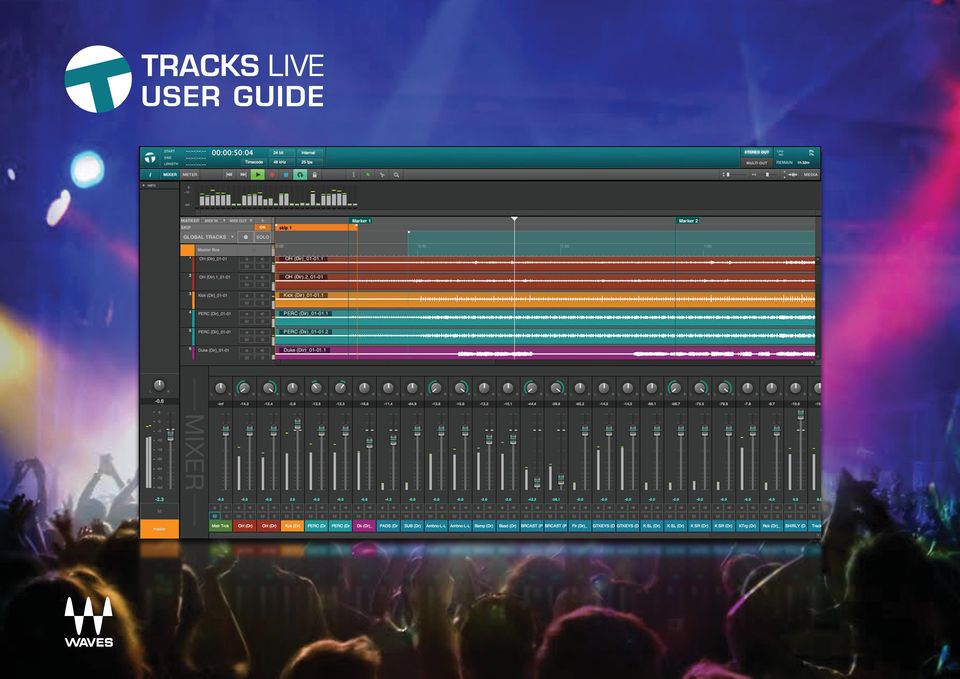
5 Main Window Essentials All record, playback, edit, and marking functions are carried out in the Main window. It s a very straightforward recording environment, and it s where you will spend most of your time. Tracks Live: Main Window Solo Button Input Monitoring Button Track Name Mute Button Record Enable Button Channel Fader Position Channel Fader Peak Meter Channel Panner Info Panel Hide/View Track Color Selector Hide/View Inspector Hide/View Mixer Hide/View Meter Hide/View Transport: Rewind Transport: Fast Forward Transport: Play Transport: Record Transport: Stop Loop Playback System Lock Range Select Tool Object Select Tool Split Tool Zoom Tool Vertical Zoom Control Horizontal Zoom Control Stereo Out Mode Selector Multi Out Mode Selector CPU and HD Usage Indicator Media Button Waveform Zoom Control 5

6 A Tracks Live session can consist of up to 256 tracks. You can view the Main window timeline only or see the timeline with a mixer. Alternatively, you can use the Inspector to control a selected track without giving up track space. Enable these views with the buttons on the right side of the window. Solo or record enable tracks individually or with Global Track buttons. Physical input from the I/O device Track name as defined in the Audio System Settings window Double click to rename. Mono track Stereo track Drag a track to change its position. When you move a track, it gets new I/O assignments that match its new location. 6

7 Operation Modes There are two modes for monitoring a recording: The Multi Out mode sends each track to an output port without creating a stereo mix. Tracks go directly to their I/O ports. When Multi Out mode is selected, the Tracks Live mixer is bypassed and is not visible. The Stereo Out mode adds a mixer with a stereo out, providing a 2-track monitor or reference mix that can be sent to an external device. When Stereo Out mode is selected, a Master Bus track appears. Ruler Above the tracks is the Ruler section. It is divided into four rulers: Marker ruler Skip ruler Loop range Timecode/Time ruler You can hide the Marker and Skip rulers from the Global Tracks drop-down menu. 7

8 Setup When you launch Tracks Live, you will first see the Session Setup window. Choose between opening a saved session or template, or creating a new session. To create a new Tracks Live session: 1. Check that the current settings are correct for the new session. These settings are displayed in the box on the left. 2. If these are not what you want for the new session, click System Settings and configure the system in the Preferences window. When finished, click OK to return to the Session window. 3. Click New Session and save the file. To create a Tracks Live session from a template: A template is a complete Tracks Live session, without audio. Templates enable you to store and recall commonly-used setups and to create new sessions from these. Open Template takes you to a browser with all available Tracks Live templates. Once a template opens, save it as a Tracks Live session. Or Recent Template displays the ten most recent templates. Open a template and save it as a session. Templates are created from existing sessions. Choose Save as Template from the File menu in the active session. These files carry the extension *.template, and can be placed in any folder. There are no factory templates. To open an existing Tracks Live session: Open Saved Session. This takes you to a browser. Open the desired session file. Or Open a Recent Session. The ten most recent sessions are listed in the window. The System Settings button opens the Tracks Preferences page. 8

9 Audio System Settings Page To Set Track Preferences 1 Select I/O interface. 2 Set sample rate and buffer size 3 Select output mode: Stereo or Multi 4 Configure inputs 5 Configure outputs 6 Click OK to return to the Settings window Input ports. The number and configuration of input channels is determined by the I/O device. Input ports On/Off selector Recorder input tracks can be named and moved here. Track names will appear in the Main window. Output ports. Number of output channels is determined by I/O device. 6 Use the Tracks Preferences page to select an interface, set sample rate and bit depth, configure I/Os and tracks, and choose an operation mode. The number of I/O ports determines how many input and output tracks are available. Complete your assignment and click OK. This returns you to the Session Setup window. 9

10 7 Click New Session. 7 Name the session. This creates a new session and opens the Main window. You are now ready to record. 10

11 RECORDING In this section you will find an overview of the recording process. For more information, refer to the Controls and Menus section. Tracks Tracks Live can provide up to 256 stereo, 256 mono tracks, or a combination thereof. When you first open a session, the number of tracks is equal to the number of active input ports shown in the Audio System Settings window. Input channels that have been turned off will not appear in the track sequence. To select a track, click anywhere on its track header. Ctrl (CMD) + Click selects multiple tracks Shift + Click selects a range of tracks. Drag a selected track to re-sequence the track order. When you move a track, its input and output ports are reassigned. Track Names Name a track by double-clicking on the track s name cell. Tab to move from one name cell to the next. You cannot rename a track that is Record Enabled. Track Number Track Color Track Name Track Meter Adding Tracks Use the Tracks menu to add or remove tracks. A new track is created directly beneath a selected track. Master Bus When a session is in the Stereo Out mode, a Master Bus appears at the bottom of the tracks section. This bus is the stereo output of the mixer, and is used to send the monitor mix to another destination. The Master Bus is not used in Multi Out mode. 11

12 Track Controls Solo, Mute, Record Enable, and Input Monitoring can be selected on any track. Record Enable Input Monitoring Solo Mute To set the status of all tracks, use the Global Tracks commands. Global Tracks Drop-Down Menu Marker MIDI Input Port Selector/Activity Indicator Marker MIDI Output Port Selector/Activity Indicator Global Skip Enable/Disable Clear Solo Global Record Enable/Disable Indicator/Button Global Solo clears the solos on all tracks. In Multi Out mode, the Global Mute button selects/deselects mutes on all tracks. Click twice to clear all mutes when only certain tracks are muted. To make a track Solo Safe, Crtl/CMD + click on the track s Solo button, or right-click to access the contextual menu. Track Meters Each track has an input meter, to the right of the Solo/Mute section. 12

13 Monitoring a Recording Tracks Live has two modes of operation: Stereo Out and Multi Out. Use the Stereo Out mode to create a stereo monitor mix while recording. When you select this mode and click on the Mixer button, the Tracks Live mixer window appears. Recording is not affected by the mixer. The mixer has one stereo master bus. The mixer s Mute, Solo, Input Monitoring, and Record Enable modes reflect their status in the track. The Inspector on the left side of the mixer provides a focused view of the selected track. This is useful when you prefer to see more tracks but still want to control the mix of selected channels. The mixer is bypassed in Multi Out mode, serving instead as a meter section. The Multi Out mode is useful when monitoring through an external console or for doing virtual soundcheck. No stereo mix is created. Instead, each track outputs directly to an I/O port. Starting a Recording Record Enable readies a track for recording. Use the Global Enable button to enable and disable all tracks for recording. The Record button begins and ends recording on all enabled tracks. You can toggle in and out of recording on a specific track, on the fly, by clicking on its Record Enable button. If no tracks are record-enabled, pressing the Record button will enable all tracks and initiate the recording. A new recording takes on the name of its track, followed by a take number. 13

14 PLAying BACk Start and stop playback with the space key, the Transport window, or by double-clicking on the ruler. Rulers The Ruler section is used to control the playhead, define areas to skip or loop on playback, and set location markers, which can be enabled to trigger or respond to MIDI commands. Click on the Time ruler section to place the playhead. Double-click on the ruler to immediately play from that location. MIDI Input and Output Port Selectors Add marker button Global Skip On/Off Marker Skip Range MIDI-enabled marker Locked MIDI-enabled marker 8 Playhead 9 Timeline Ruler Use the drop-down menu on the Global Tracks panel to expose and hide the Skip and Marker rulers. 14

15 Markers Markers are placeholders or tab points that are used to navigate on the timeline. To add a marker, place the playhead at the desired location and then click the + button on the left of the Marker ruler, or double-click on the ruler itself. You can set an on-the-fly marker when the playhead is moving. Slide a marker horizontally to change its location. Right-click to reveal its contextual menu. Use this menu to manage and position the marker. Enabling a Marker for MIDI Program Changes A marker can be used to send and receive program change messages. In record mode, a marker is placed on the Markers ruler when Tracks Live receives a program change message from an external device. When the transport is in playback or stop mode and Tracks Live receives a program change message, the playhead will relocate to the marker that corresponds to the program change number received on the MIDI port. 15

16 To enable a marker to send/receive program change messages, select Show Marker Inspector in the marker s contextual menu. Enable Program Change. The marker will now display MIDI. Assign ports with the Marker MIDI In and Out drop-down menus in the Global panel. (Only enabled MIDI ports will appear in the drop-down menus.) Range Controls Use the Ruler to define timeline ranges you wish to skip or loop. Skip To skip over a range during playback, click-drag in the Skip ruler. The resulting yellow band defines what will not be played. Change the location of a skip range by dragging. Change its duration by dragging on the corner boxes. Combine two skip ranges by moving them together. Enable/Disable a skip range by left-clicking once. Right-click for a contextual menu that provides other Skip options. Loop Playback Define a playback loop range by dragging on the Loop ruler. To disable all skip ranges, deselect the Global Skip button. 16

17 Change the location of the range by dragging. Change its duration by dragging on the corner boxes. Right-click to reveal a contextual menu for further adjustments. Define only one loop range at a time. Select the Loop button on the transport panel to engage the loop. The playhead will relocate to the beginning of the loop, awaiting a play command. Main Window Tools Four tools are located in the top toolbar. Each can be accessed by its toolbar button or by typing its number. Alternatively, right-click on any empty area of the timeline to reveal a menu for quick access to the window tools. Range Select - Defines part of a region, a complete region, multiple regions, or any area on the timeline. This tool is most commonly used to select an area to be deleted. Object Select - Selects entire regions. CTRL/CMD + click to select multiple regions. CTRL/CMD + Shift to select a range of regions. This tool is also used to copy and move regions. Split - Splits a region where the tool is hovered. Zoom - Zooms to a selected area. To zoom out, click Ctrl + click with the zoom tool. 17

18 Other Zoom Controls In addition to the Zoom tool, there are three zoom controls at the right-hand side of the toolbar. Track Height - Makes all tracks taller or shorter. To resize individual tracks, use the mouse wheel or the track s contextual menu. Horizontal Zoom - Zooms in/out horizontally to playhead. Waveform zoom - Increases/decreases height of the waveform. Mouse Wheel Controls Mouse wheel Shift + wheel CTRL + wheel ALT + wheel Moves the Main window display vertically. Moves timeline horizontally. Zooms in/out horizontally to playhead (keyboard + and - will also zoom vertically). Changes vertical track size. Mixer Tracks Live includes a monitor mixer for creating a reference mix. It is available only in the Stereo Out mode. Use the button on the right-hand corner of the Main page to hide/unhide the mixer. The mixer is simple and intuitive. Channel names reflect track names. Controls/displays for mute, solo, record enable, and input monitor mirror those on the tracks. Fader and meters range: - to +6 db. Adjust meter behavior in the Preferences window. 18
. Changes vertical track size. Mixer Tracks Live includes a monitor mixer for creating a reference mix.")
19 In the Stereo Out mode, the output of the mixer is routed to the Master Bus, which can be sent to an I/O port for monitoring. Inspector It is not necessary to view the Mixer pane to control the level and panning of a track. The Inspector is a sidebar that displays the channel strip of a selected track. This allows you control a focused track while seeing many tracks in the Main window. It is not necessary to view the Mixer pane to control the level and panning of a track. Use the button labeled i to open the Inspector. Beneath this panel is a palette that can be used to color-code tracks. The Info section reveals the input and output routing for the selected track. 19

20 Controls and MENUS This chapter provides a description of the major windows and controls. Session Window The Session window appears when you launch Tracks Live. Here you load your saved sessions and create new ones. Open Recent Sessions The ten most recent sessions are displayed in a column on the right. Double-click on a session name and it will load. Open Saved Session Opens a browser window from which you load session files. Tracks Live sessions end with the extension ardour. New Session Creates a new session based on the settings shown in the System Status box. This is useful when you want to create a session with the same I/O and audio configuration as the current one. Current System Settings Display The current System status is displayed on the left side of the window. This reports the current setting of the Tracks Live system, not that of the selected session. Tracks Live will issue a request to the I/O device to match its sample rate to the sample rate saved with the session. If the I/O device cannot complete this request, then the session will play at an incorrect speed. System Settings Opens the Audio Systems Settings tab of the Tracks Preferences page, where sample rate, bit depth, and I/O parameters are set. Before creating a new session, confirm that I/O settings, track names, audio parameters and monitoring mode are set correctly. Click OK to confirm settings and return to the Session window, where you can create a new session based on this configuration. The Preferences page is discussed in detail in the next section. You can also access the Preferences page by typing [CMD/CTRL +, (comma)]. 20

21 Preferences Window The Tracks Preferences window consists of four tabs: Audio System Settings MIDI System Settings Session Settings Preferences Tracks Preferences: Audio System Settings This section is used to configure hardware I/O devices. General information concerning the audio engine and interface is shown at the top of the tab. 21
22 Audio Engine This is a fixed value: Core Audio for Macintosh, ASIO for Windows. Interface Selects the I/O device. All available devices are listed, as are devices that were available previously but presently are not. Select None to disconnect all I/O devices. Tracks Live automatically detects connected interface devices. When a new interface is detected, it will be added to the list of available interfaces in the drop-down menu. Sample Rate (44.1, 48, 88.2, 96, 172.4, 192 khz) Sets the system sample rate. Choosing a sample rate from the drop-down menu sends a request to the I/O device to adjust to the selected rate. If the device cannot meet this request, you will have to adjust the I/O manually using the device s control panel. If the I/O is still unable to adjust to the requested sample rate, Tracks Live will accept the device s sample rate, resulting in incorrect playback speed. Buffer Size (32, 64, 128, 256, 512, 1024 samples) Selects the buffer size for the audio engine. Default is 1024 samples. Device Control Panel Opens the control panel of the selected (current) I/O device. Latency Indicates the system s input, output, and total latency. Operation Mode There are two operation modes: Multi Out Each track is routed to its own port. No internal mixing. Stereo Out Stereo mix of all tracks is sent via a master bus to an output port. 22
23 I/O Configuration Used to enable and disable input and output ports. Port names are determined by the I/O. You may apply device port names to newly created tracks, if desired. Select Name Tracks after Driver to assign tracks the names of the corresponding driver channels. To restore original track names, click Reset Track Names to Default. I/O inputs and outputs can be turned on or off, either individually or as a group using the All buttons. Tracks Preferences: MIDI System Settings Tracks Live automatically senses connected MIDI devices. When a new device is detected, it is added to the list of available interfaces. MIDI Ports displays all detected ports Port On/Off enables a MIDI port. Enabled ports are visible in the MIDI Marker drop-down menu on the Main window. MTC Input selects MTC input port. 23
24 Tracks Preferences: Session Settings New Session Default Location sets the path for a new session. Recordings share the same path. Auto Lock Timer sets the amount of time after Record is initiated until Tracks Live will go into a locked state. When the interface is locked, keyboard and mouse input are disabled until the interface is manually unlocked. This prevents accidental interference with ongoing recordings. You can lock the system manually by clicking the Lock button on the Transport panel. File Type, Bit Depth and Frame Rate are normally determined during setup. However, these settings can be changed while a session is open all subsequent recordings will bear the new parameters. 24
25 Tracks Preferences: Preferences Most of the Preferences tab is quite obvious, but a few items may need explanation. Meter Ballistics Sets the speed of the meter bar release. Drive Buffering Changes the size of the drive buffer to optimize the system for different drive speeds. In general, a smaller buffer yields greater responsiveness. Fast drives can normally use a smaller buffer size. Slower drives require a larger buffer. 25
26 Tracks Preferences: Sync Sets the timecode format and port used for synchronizing with external devices. Tracks Live can lock to longitudinal timecode (LTC) or to MIDI timecode (MTC). LTC 1. Open the Sync tab in the preferences page. Select LTC from the drop-down menu and choose the port to which the LTC source is connected. 2. Set the session timecode frame rate to match that of the timecode source. Session timecode can be set in the Main window or in the Sessions Settings tab. 3. Open the Session Timecode Sync Selector/Display menu in the Top Bar. Select LTC (the default is Internal). A notice will appear to indicate timecode status. Playback will begin when valid timecode is received. 4. Use the Sync Selector/Display menu to toggle the transport in and out of timecode chase mode. MTC 1. To lock the recorder to a MIDI timecode source, select MTC from the Sync Selector/Display menu. 2. Choose a sync port from the list of options. 26
27 Main Window Use of the Main window is discussed in the previous chapter. This section describes the window s menus and controls in more depth. Transport Panel The Tracks Live transport controls work just as you d expect with any recorder/player. Previous Marker moves the playhead to the previous marker. If no markers are present, the playhead moves to the session start time, 00:00:00:00. Next Marker moves the playhead to the next marker. If no markers are present, the playhead moves to the session s end. Play starts/stops transport play. Record begins recording on all enabled tracks. If no tracks are record-enabled, Record enables all tracks and begins recording. Stop stops playback and record. Loop enables/disables the loop range as set in the Ruler. Lock disables keyboard and mouse input. When Lock is engaged, a System Locked window appears, which you can then use to unlock the system. Use Preferences > Session Settings > Auto Lock Timer to set the time that elapses between tracks being record enabled and the system entering locked mode. The Lock function protects you from ruining a recording because of an accidental keystroke or mouse nudge. All commands except Unlock System are ignored. However, Lock is not a security feature that will prevent others from accessing your session. It is not password protected. 27
28 Top Bar The left side of the Top Bar provides information. It also provides control over basic session parameters. Selection Display Playhead Position Display Clock Format Display Selector Session Bit Depth Session Sample Rate Selector/Display Session Timecode Sync Selector/Display Session Frame Rate Selector/Display The three small displays indicate start, end, and length of selections. The large time indicator indicates playhead location. Select display format with the drop-down menu. There are three more display buttons in this section. i Mixer Meter Shows/hides the Inspector Reveals the Main Page mixer Hides/unhides meters that show an overview of all tracks in the session. In this view, the Main page is hidden. There are four session setup shortcuts. These are locked when the transport is playing or recording. Bit depth/frame rate Takes you to the Session Settings window Sample rate Reveals a drop-down menu of sample rate options Clock source Selects system clock source 28
29 Tools Three tools are used to select, move, and cut regions on the timeline. A fourth is used to zoom. Choose a tool using the Top Bar buttons, or with numbers 1 4 on the keyboard. Range Select - Defines part of a region, a complete region, multiple regions, or any area on the timeline. Object Select - Selects entire regions. CTRL/CMD + click to select multiple regions. CTRL/CMD + Shift + click to select a range of regions. This tool is also used to copy and move regions. Grab the end of a region to change its length. Split - Splits all selected regions. Zoom - Zooms to an area specified by the icon. You can also choose a tool by right-clicking on any empty part of the timeline. In addition to the Zoom tool, there are three zoom controls on the right side of the toolbar. Track Height - Makes all tracks taller or shorter. To resize individual tracks, use the mouse wheel. Horizontal Zoom Zooms - in/out horizontally to the playhead Waveform zoom - Increases/decreases waveform height 29
30 Regions Menus Region control menus provide additional control over regions and the ranges within them. If a region does not include a selected range, right-click to access this menu. This menu offers standard cut/paste editing features, as well as tools for managing regions. If a region includes a selected range, the Range menu will appear. This menu is primarily used to define a range and apply it to functions such as loop, skip, and punch. Numerous file functions can be accessed from this menu. 30
31 Fade Menu Adjust fade length by grabbing the box at the top using the Object Select tool. To change the fade type, right-click on the fade to reveal this menu. System Status Indicators CPU and HD - Percent of CPU being used. Remain - Remaining recording time, based on number of currently enabled tracks. Inspector The Inspector offers additional information and controls. Use the button labeled i to open the Inspector. Track Input Display Track Output Display 31
32 Use the palette to color-code tracks. Select a track, or a group of tracks, and then choose a color. The Info section reveals the input and output routing for the selected track. Select the Master Bus (Stereo Out mode only) to reveal inputs and outputs for all tracks in the session. A fader/meter focuses a selected track. This enables you to view and control the level and pan of a track without opening the Mixer view. Record-Enabled Overview Above the rulers is a small section that indicates which tracks are record-enabled. Hover over a cell to reveal its track name. Also in this section is a small meter bridge that indicates playback/record level. Information Page This button opens a splash screen that indicates the version of Tracks Live that you are running. 32
33 Meter Section The Meter window provides a clean overview of input level for each track. As in other views, the Inspector is used to control monitor level and pan for a selected track. Meter behavior is controlled on the Preferences tab. 33
34 Export (File Menu) Exports to a stereo mix or stems. Define export range in the timeline. There are four ways to set the range. Selection Skip markers Loop definitions Session Choose Mixdown or Stem Export from the File Menu Mixdown creates a stereo mix of all channels in the defined time range. Stem Export creates a separate export file for each channel. Export Dialog Box File Format tab Define export file format, details, name, and folder 34
35 35 Time Span tab Choose the method of defining export range (selection, skip markers, loop, session). Only ranges that have been defined on the timeline are displayed. If no audio is selected and there are no active skip markers or loops, then the export range will be the session length plus five seconds.
36 Channels tab In the Mixdown mode Export stereo audio mixdown as two mono files or as interleaved stereo file. In the Stem Export mode The stem export mode creates a new file for each checked channel. All tracks in the session appear in the list. Deselect to remove the track from the export. Export Region Contents creates a continuous file from each session channel. Automation, mutes, and solos are ignored. Export Track Output also creates a continuous file from each session channel. All automation is incorporated in the export. 36
Soundcraft Signature MTK Recording Guide
 Soundcraft Signature MTK Recording Guide S O U N D C R A F T S I G N AT U R E M T K R E C O R D I N G G U I D E 2 Table of Contents USB Overview... 04 Installing the Drivers (PC Only)... 04 Finding the
NVMS-1200. User Manual
 NVMS-1200 User Manual Contents 1 Software Introduction... 1 1.1 Summary... 1 1.2 Install and Uninstall... 1 1.2.1 Install the Software... 1 2 Login Software... 3 2.1 Login... 3 2.2 Control Panel Instruction...
Multi-Site 4200. Remote Viewing Software. User Guide
 Multi-Site 4200 Remote Viewing Software User Guide Document 800-12064V1 Rev A 09/2012 User Guide Revisions Issue Date Revisions A 07/2012 New document. V1 Rev A 09/2012 Updated the description of the
WAVES. MultiRack SETUP GUIDE V9.80
 WAVES MultiRack SETUP GUIDE V9.80 1 Table of Contents 1. Overview... 3 2. Basic Requirements... 3 3. Software... 4 4. Required Waves Licenses... 4 5. Installing MultiRack... 5 6. MultiRack Native... 6
Live Recording with M7CL-48ES & AuviTran Network ASIO Streamer. Using Steinberg Cubase 5 or Nuendo 5.
 & AuviTran Network ASIO Streamer Using Steinberg Cubase 5 or Nuendo 5. Summary: This guide shows how quick and easy it is to achieve a high quality, live multitrack recording using Yamaha M7CL-48ES, stage-boxes
WAVES MultiRack SoundGrid USER GUIDE V9.7
 WAVES MultiRack SoundGrid USER GUIDE V9.7 Processing Host for Your DiGiCo Console 1 Table of Contents 1. The Rack in Detail... 3 2. Adding Plugins to a Rack... 6 3. Rack View: Controlling Your Plug-ins...
Basics. Mbox 2. Version 7.0
 Basics Mbox 2 Version 7.0 Copyright 2005 Digidesign, a division of Avid Technology, Inc. All rights reserved. This guide may not be duplicated in whole or in part without the express written consent of
Live Recording with M7CL or PM5D Via EtherSound. Using Steinberg Cubase 4 or Nuendo 4
 Live Recording with M7CL or PM5D Via EtherSound Using Steinberg Cubase 4 or Nuendo 4 Summary: This guide will show how quick and easy it is to achieve a high quality, live multi-track recording using a
6. If you want to enter specific formats, click the Format Tab to auto format the information that is entered into the field.
 Adobe Acrobat Professional X Part 3 - Creating Fillable Forms Preparing the Form Create the form in Word, including underlines, images and any other text you would like showing on the form. Convert the
AJA Control Room. Installation & Operation Guide. Software. Version 1.0 Published: April 22, 2014
 AJA Control Room Software Installation & Operation Guide Version 1.0 Published: April 22, 2014 Table of Contents Notices........................................................ 3 Trademarks........................................................................
History Explorer. View and Export Logged Print Job Information WHITE PAPER
 History Explorer View and Export Logged Print Job Information WHITE PAPER Contents Overview 3 Logging Information to the System Database 4 Logging Print Job Information from BarTender Designer 4 Logging
NVMS - 1000 USER MANUAL. Version 2.1.0
 NVMS - 1000 USER MANUAL Version 2.1.0 Contents 1 Software Introduction... 1 1.1 Summary... 1 1.2 Operation Environment... 1 1.3 Install and Uninstall... 2 1.3.1 Install the Software... 2 1.3.2 Uninstall
Live Recording with AuviTran AV3rd-ES100 & Network ASIO Streamer
 Live Recording with AuviTran AV3rd-ES100 & Network ASIO Streamer Using Steinberg Nuendo 5. 1 Summary: This guide shows how quick and easy it is to achieve a high quality, live multitrack recording using
Recording Supervisor Manual Presence Software
 Presence Software Version 9.2 Date: 09/2014 2 Contents... 3 1. Introduction... 4 2. Installation and configuration... 5 3. Presence Recording architectures Operating modes... 5 Integrated... with Presence
13 Managing Devices. Your computer is an assembly of many components from different manufacturers. LESSON OBJECTIVES
 LESSON 13 Managing Devices OBJECTIVES After completing this lesson, you will be able to: 1. Open System Properties. 2. Use Device Manager. 3. Understand hardware profiles. 4. Set performance options. Estimated
ACS CLIENT SOFTWARE USER MANUAL
 ACS CLIENT SOFTWARE USER MANUAL 1 ACS USER GUIDE 1.1 System Requirement Recommended System Requirement OS CPU VGA RAM HDD WindowXP, Vista Pentium 4, 2Ghz 1024*768, 64MB 24bit color graphic card 1GB 20MB
Premiere Pro CC Workflow Setting up your project
 Premiere Pro CC Workflow Setting up your project In This Section 1. Project Settings 2. Sequence Settings for AVCHD cameras 3. Sequence Settings for P2 cameras 4. Sequence Settings Slideshows 4. Sequence
Using WaveCenter/PCI with Cakewalk Pro Audio
 Using WaveCenter/PCI with Cakewalk Pro Audio Released 000528 This application note was created based on: Cakewalk Pro Audio version 9.02 WaveCenter/PCI driver v2.06 (WCPCI in this document) Cakewalk includes
Introduction to MS WINDOWS XP
 Introduction to MS WINDOWS XP Mouse Desktop Windows Applications File handling Introduction to MS Windows XP 2 Table of Contents What is Windows XP?... 3 Windows within Windows... 3 The Desktop... 3 The
Microsoft PowerPoint 2010
 Microsoft PowerPoint 2010 Starting PowerPoint... 2 PowerPoint Window Properties... 2 The Ribbon... 3 Default Tabs... 3 Contextual Tabs... 3 Minimizing and Restoring the Ribbon... 4 The Backstage View...
EMC Documentum Webtop
 EMC Documentum Webtop Version 6.5 User Guide P/N 300 007 239 A01 EMC Corporation Corporate Headquarters: Hopkinton, MA 01748 9103 1 508 435 1000 www.emc.com Copyright 1994 2008 EMC Corporation. All rights
Video Client. en Software manual
 Video Client en Software manual Video Client Table of Contents en 3 Table of contents 1 Introduction 6 1.1 System requirements 6 1.2 Software installation 6 1.3 Conventions used in the application 6 2
Microsoft Access 2010 handout
 Microsoft Access 2010 handout Access 2010 is a relational database program you can use to create and manage large quantities of data. You can use Access to manage anything from a home inventory to a giant
Using the US-122 with GigaStudio and Cubasis
 Using the US-122 with GigaStudio and Cubasis To use the US-122 with the supplied GigaStudio 24 and Cubasis applications together on Windows, you will need to carry out the following steps after installing
Decision Support AITS University Administration. Web Intelligence Rich Client 4.1 User Guide
 Decision Support AITS University Administration Web Intelligence Rich Client 4.1 User Guide 2 P age Web Intelligence 4.1 User Guide Web Intelligence 4.1 User Guide Contents Getting Started in Web Intelligence
GETTING STARTED WITH STUDIO ONE ARTIST
 GETTING STARTED WITH STUDIO ONE ARTIST 2009, PreSonus Audio Electronics, Inc. All Rights Reserved. TABLE OF CONTENTS Studio One Artist Features...3 System Requirements...4 Installation and Authorization...5
Build Your First Web-based Report Using the SAS 9.2 Business Intelligence Clients
 Technical Paper Build Your First Web-based Report Using the SAS 9.2 Business Intelligence Clients A practical introduction to SAS Information Map Studio and SAS Web Report Studio for new and experienced
NDA-30141 ISSUE 1 STOCK # 200893. CallCenterWorX-Enterprise IMX MAT Quick Reference Guide MAY, 2000. NEC America, Inc.
 NDA-30141 ISSUE 1 STOCK # 200893 CallCenterWorX-Enterprise IMX MAT Quick Reference Guide MAY, 2000 NEC America, Inc. LIABILITY DISCLAIMER NEC America, Inc. reserves the right to change the specifications,
Embroidery Fonts Plus ( EFP ) Tutorial Guide Version 1.0505
 Tutorial Guide Version 1.0505") Embroidery Fonts Plus ( EFP ) Tutorial Guide Version 1.0505 1 Contents Chapter 1 System Requirements.................. 3 Chapter 2 Quick Start Installation.................. 4 System Requirements................
Embroidery Fonts Plus ( EFP ) Tutorial Guide Version 1.0505 1 Contents Chapter 1 System Requirements.................. 3 Chapter 2 Quick Start Installation.................. 4 System Requirements................
VMS A1 Client Software. User Manual (V2.0)
") VMS A1 Client Software User Manual (V2.0) Contents Chapter 1 Overview...4 1.1 Description...4 1.2 Running Environment...4 1.3 Function Modules...5 Chapter 2 Live View...7 2.1 User Registration and Login...7
VMS A1 Client Software User Manual (V2.0) Contents Chapter 1 Overview...4 1.1 Description...4 1.2 Running Environment...4 1.3 Function Modules...5 Chapter 2 Live View...7 2.1 User Registration and Login...7
ImagineWorldClient Client Management Software. User s Manual. (Revision-2)
") ImagineWorldClient Client Management Software User s Manual (Revision-2) (888) 379-2666 US Toll Free (905) 336-9665 Phone (905) 336-9662 Fax www.videotransmitters.com 1 Contents 1. CMS SOFTWARE FEATURES...4
ImagineWorldClient Client Management Software User s Manual (Revision-2) (888) 379-2666 US Toll Free (905) 336-9665 Phone (905) 336-9662 Fax www.videotransmitters.com 1 Contents 1. CMS SOFTWARE FEATURES...4
Studio One Mackie Control Support
 Studio One Mackie Control Support Table of Contents Introduction... 1 1 Setup... 1 1.1 Main Unit... 1 1.2 Extender... 1 1.3 Grouping Units... 2 2 Function Overview... 3 2.1 Mixer... 3 2.1.1 Layout... 3
Central Management Software CV3-M1024
 Table of Contents Chapter 1. User Interface Overview...5 Chapter 2. Installation...6 2.1 Beginning Installation...6 2.2 Starting the CMS software...10 2.3 Starting it from the Start menu...10 2.4 Starting
Hermes.Net IVR Designer Page 2 36
 Hermes.Net IVR Designer Page 2 36 Summary 1. Introduction 4 1.1 IVR Features 4 2. The interface 5 2.1 Description of the Interface 6 2.1.1 Menus. Provides 6 2.1.2 Commands for IVR editions. 6 2.1.3 Commands
Chapter 9 Slide Shows
 Impress Guide Chapter 9 Slide Shows Transitions, animations, and more Copyright This document is Copyright 2007 2013 by its contributors as listed below. You may distribute it and/or modify it under the
Colligo Email Manager 6.0. Offline Mode - User Guide
 6.0 Offline Mode - User Guide Contents Colligo Email Manager 1 Key Features 1 Benefits 1 Installing and Activating Colligo Email Manager 2 Checking for Updates 3 Updating Your License Key 3 Managing SharePoint
Waves MultiRack SoundGrid Outboard Processing Host for Live Applications
 Waves MultiRack SoundGrid Outboard Processing Host for Live Applications Issue B - Sept 2010 1-1 1-2 Contents 1.1 Introduction......1-4 1.1.1 Welcome......1-4 1.1.2 Product Overview......1-4 2.1 Quick
Authoring for Dolby Atmos Cinema Sound Manual
 Authoring for Dolby Atmos Cinema Sound Manual Issue 3 Software v1.4 Corporate Headquarters Dolby Laboratories, Inc. 100 Potrero Avenue San Francisco, CA 94103-4813 USA Telephone 415-558-0200 Fax 415-863-1373
Calrec SoundGrid I/O. User Guide
 Calrec SoundGrid I/O User Guide 1 TABLE OF CONTENTS 1. Introduction... 3 1.1 About SoundGrid and the Calrec Audio Interface... 3 1.2 Typical Uses... 4 1.3 Native/SoundGrid Comparison Table... 6 2. Hardware
OPERATION MANUAL. MV-410RGB Layout Editor. Version 2.1- higher
 OPERATION MANUAL MV-410RGB Layout Editor Version 2.1- higher Table of Contents 1. Setup... 1 1-1. Overview... 1 1-2. System Requirements... 1 1-3. Operation Flow... 1 1-4. Installing MV-410RGB Layout
Q. The Phone Manager call banner disappears after being displayed for a couple of seconds...5 Q. The Phone Manager icon in the taskbar is blue and
 Phone Manager FAQ s Q. The Phone Manager call banner disappears after being displayed for a couple of seconds...5 Q. The Phone Manager icon in the taskbar is blue and has a cross on it. 5 Q. Some options
Recording using Cubase LE 6
 PowerMate 3 /CMS 3 Application Note 1 Recording using Cubase LE 6 This document describes how to record a live event using the DIGITAL AUDIO INTERFACE of the PowerMate 3 / CMS 3. In preparation for the
Raptor K30 Gaming Software
 Raptor K30 Gaming Software User Guide Revision 1.0 Copyright 2013, Corsair Components, Inc. All Rights Reserved. Corsair, the Sails logo, and Vengeance are registered trademarks of Corsair in the United
In this article, learn how to create and manipulate masks through both the worksheet and graph window.
 Masking Data In this article, learn how to create and manipulate masks through both the worksheet and graph window. The article is split up into four main sections: The Mask toolbar The Mask Toolbar Buttons
Adobe Audition Workshop Instructor: Sam Fuqua
 Adobe Audition Workshop Instructor: Sam Fuqua Class Objectives Learn the interface for Adobe s audio enhancement software Learn how to do basic recordings, both single and multi-track Learn how to repair
Getting Started with CodeXL
 AMD Developer Tools Team Advanced Micro Devices, Inc. Table of Contents Introduction... 2 Install CodeXL... 2 Validate CodeXL installation... 3 CodeXL help... 5 Run the Teapot Sample project... 5 Basic
Editor / Plug-In Editor Manual
 Editor / Plug-In Editor Manual E 3 Table of Contents Introduction................................................. Main features...................................................................... Please
Hosted Call Recorder Guide. Rev A (21/11/14)
") Hosted Call Recorder Guide Rev A (21/11/14) Replay Interface The Replay area of the Quantify interface is used to retrieve and replay calls from your Red Box Recorder. Below is an example of the interface
Hosted Call Recorder Guide Rev A (21/11/14) Replay Interface The Replay area of the Quantify interface is used to retrieve and replay calls from your Red Box Recorder. Below is an example of the interface
Mixing Station Manual Manual Version 0.21. This manual is not yet complete, please be patient
 Manual Version 0.21 This manual is not yet complete, please be patient Content About... 3 Compatible Mixer:... 3 Quick start... 4 Start View... 5 UI Elements... 6 Knobs... 6 Fader... 6 Main View... 7 Channel
WHAT S NEW IN WORD 2010 & HOW TO CUSTOMIZE IT
 WHAT S NEW IN WORD 2010 & HOW TO CUSTOMIZE IT The Ribbon... 2 Default Tabs... 2 Contextual Tabs... 2 Minimizing and Restoring the Ribbon... 3 Customizing the Ribbon... 3 A New Graphic Interface... 5 Live
Getting Started Guide. Chapter 14 Customizing LibreOffice
 Getting Started Guide Chapter 14 Customizing LibreOffice Copyright This document is Copyright 2010 2012 by its contributors as listed below. You may distribute it and/or modify it under the terms of either
Password Memory 6 User s Guide
 C O D E : A E R O T E C H N O L O G I E S Password Memory 6 User s Guide 2007-2015 by code:aero technologies Phone: +1 (321) 285.7447 E-mail: [email protected] Table of Contents Password Memory 6... 1
Instructions for Use. CyAn ADP. High-speed Analyzer. Summit 4.3. 0000050G June 2008. Beckman Coulter, Inc. 4300 N. Harbor Blvd. Fullerton, CA 92835
 Instructions for Use CyAn ADP High-speed Analyzer Summit 4.3 0000050G June 2008 Beckman Coulter, Inc. 4300 N. Harbor Blvd. Fullerton, CA 92835 Overview Summit software is a Windows based application that
MICROSOFT OUTLOOK 2010 WORK WITH CONTACTS
 MICROSOFT OUTLOOK 2010 WORK WITH CONTACTS Last Edited: 2012-07-09 1 Access to Outlook contacts area... 4 Manage Outlook contacts view... 5 Change the view of Contacts area... 5 Business Cards view... 6
Triggers & Actions 10
 Triggers & Actions 10 CHAPTER Introduction Triggers and actions are the building blocks that you can use to create interactivity and custom features. Once you understand how these building blocks work,
Excel 2007 Basic knowledge
 Ribbon menu The Ribbon menu system with tabs for various Excel commands. This Ribbon system replaces the traditional menus used with Excel 2003. Above the Ribbon in the upper-left corner is the Microsoft
Audio File Manager For MRS Series
 Audio File Manager For MRS Series Operation Manual Zoom Corporation Reproduction of this manual, in whole or in part, by any means, is prohibited. To display and/or print this manual, Adobe Acrobat 4.0
Microsoft Migrating to Access 2010 from Access 2003
 In This Guide Microsoft Access 2010 looks very different, so we created this guide to help you minimize the learning curve. Read on to learn key parts of the new interface, discover free Access 2010 training,
VistaPoint Companion is a client program used within the VistaPoint Enterprise system. VistaPoint Companion is available in two versions:
 VistaPoint Companion Users Guide file:///c:/users/tdavis/appdata/local/temp/~hh2a10.htm Page 1 of 3 10/22/2012 VistaPoint Companion Users Guide For VistaPoint Console Companion and VistaPoint Desktop Companion
FastTrack Schedule 10. Tutorials Manual. Copyright 2010, AEC Software, Inc. All rights reserved.
 FastTrack Schedule 10 Tutorials Manual FastTrack Schedule Documentation Version 10.0.0 by Carol S. Williamson AEC Software, Inc. With FastTrack Schedule 10, the new version of the award-winning project
GOOGLE DOCS APPLICATION WORK WITH GOOGLE DOCUMENTS
 GOOGLE DOCS APPLICATION WORK WITH GOOGLE DOCUMENTS Last Edited: 2012-07-09 1 Navigate the document interface... 4 Create and Name a new document... 5 Create a new Google document... 5 Name Google documents...
LiveProfessor. The Audio Processor. User manual - Version 1.0
 LiveProfessor The Audio Processor User manual - Version 1.0 Manual revision 5 Sept - 2012 Contents Introduction 4 Installation and setup 5 System requirements 5 First run 5 Audio settings Plugins Updates
NETWORK PRINT MONITOR User Guide
 NETWORK PRINT MONITOR User Guide Legal Notes Unauthorized reproduction of all or part of this guide is prohibited. The information in this guide is subject to change without notice. We cannot be held liable
CinePlay 1.1.2. User Manual
 CinePlay User Manual 1 CinePlay 1.1.2 User Manual CinePlay is a professional ios video player complete with timecode overlays, markers, masking, safe areas and much more. It is ideal for dailies, portfolios,
CDOT Monumentation Sheets
 CDOT Monumentation Sheets This document describes the process used to assemble a Right of Way Monumentation Sheet. An InRoads XML report is used to display the required data from the geometry project.
Appendix A How to create a data-sharing lab
 Appendix A How to create a data-sharing lab Creating a lab involves completing five major steps: creating lists, then graphs, then the page for lab instructions, then adding forms to the lab instructions,
Access to remote DVR from IE USER S MANUAL CONTENT
 Access to remote DVR from IE CONTENT... 2 Preface... 2 1. Introduction... 2 2. System requirement and executing environment... 2 2.1. Supported operating System:... 2 2.2. Hardware requirement (recommend):...
CONFIGURATION MANUAL FILE TRANSFER DAEMON. Version 3.7 - June 2014
 CONFIGURATION MANUAL FILE TRANSFER DAEMON Version 3.7 - June 2014 CONFIGURATION MANUAL IP2Archive 1.4 File Transfer Daemon 3.7 Copyright EVS Broadcast Equipment SA Copyright 2003-2014. All rights reserved.
Basic File Management & Navigation
 Basic File Management & Navigation Windows Explorer 1. Open Windows Explorer. (From the "Start-Programs" menu, or "Quick Launch" shortcut, or keyboard shortcut: "Microsoft flag symbol - E") 2. Within "Explorer",
Lesson 4. Temporal Management of Layers
 Lesson 4 Temporal Management of Layers In lesson 3, we handled the layers using the timeline. However, the notion of time did not come up at all. This lesson deals with the notion of time. In this lesson
CORSAIR GAMING KEYBOARD SOFTWARE USER MANUAL
 CORSAIR GAMING KEYBOARD SOFTWARE USER MANUAL TABLE OF CONTENTS CORSAIR UTILITY ENGINE OVERVIEW PROFILES 1 9 Introduction 2 Starting the Corsair Utility Engine 2 Profiles: Settings for a Specific Program
RDM+ Remote Desktop for Android. Getting Started Guide
 RDM+ Remote Desktop for Android Getting Started Guide RDM+ (Remote Desktop for Mobiles) is a remote control tool that offers you the ability to connect to your desktop or laptop computer from Android device
What is OneDrive for Business at University of Greenwich? Accessing OneDrive from Office 365
 This guide explains how to access and use the OneDrive for Business cloud based storage system and Microsoft Office Online suite of products via a web browser. What is OneDrive for Business at University
ArcGIS. Tips and Shortcuts. for Desktop
 ArcGIS Tips and Shortcuts for Desktop Map Navigation Refresh and redraw the display. F5 Suspend the map s drawing. F9 Zoom in and out. Center map. Roll the mouse wheel backward and forward. Hold down Ctrl
D i g i g r a m. sound card range. Professional stereo and multichannel sound cards. Installation and set-up
 D i g i g r a m VX sound card range Professional stereo and multichannel sound cards Table of contents VX Cards General information...4 Supported cards...4 System requirements...4 MacIntosh...4 System
Avigilon Control Center Web Client User Guide
 Avigilon Control Center Web Client User Guide Version: 4.12 Enterprise OLH-WEBCLIENT-E-E-Rev2 Copyright 2013 Avigilon. All rights reserved. The information presented is subject to change without notice.
Outlook 2011 Window. [Day], [Work Week], [Full [Home]. Schedule and plan: Click the [New
![Outlook 2011 Window. [Day], [Work Week], [Full [Home]. Schedule and plan: Click the [New](/thumbs/27/11891778.jpg "Outlook 2011 Window. [Day], [Work Week], [Full [Home]. Schedule and plan: Click the [New") MS Outlook 2011 Quick Reference for Macintosh The Ribbon consists a series of tabs giving access to buttons, menus, and dialog boxes in various groups to facilitate locating the tools required for a particular
MS Outlook 2011 Quick Reference for Macintosh The Ribbon consists a series of tabs giving access to buttons, menus, and dialog boxes in various groups to facilitate locating the tools required for a particular
Microsoft Access 2010 Part 1: Introduction to Access
 CALIFORNIA STATE UNIVERSITY, LOS ANGELES INFORMATION TECHNOLOGY SERVICES Microsoft Access 2010 Part 1: Introduction to Access Fall 2014, Version 1.2 Table of Contents Introduction...3 Starting Access...3
Sample- for evaluation purposes only! Introductory OneNote. teachucomp, inc. A publication of TeachUcomp Incorporated. Copyright TeachUcomp, Inc.
 A publication of TeachUcomp Incorporated. Copyright TeachUcomp, Inc. 2013 Introductory OneNote teachucomp, inc. it s all about you Copyright: Copyright 2013 by TeachUcomp, Inc. All rights reserved. This
CREATE A 3D MOVIE IN DIRECTOR
 CREATE A 3D MOVIE IN DIRECTOR 2 Building Your First 3D Movie in Director Welcome to the 3D tutorial for Adobe Director. Director includes the option to create three-dimensional (3D) images, text, and animations.
Lightworks v12. Quick Start Guide
 Lightworks v12 Quick Start Guide Lightworks v12 Copyright and Disclaimer Copyright 2014 by EditShare This document, as well as any software described in it, is furnished under either a license or a confidentiality
Microsoft Outlook 2007 Calendar Features
 Microsoft Outlook 2007 Calendar Features Participant Guide HR Training and Development For technical assistance, please call 257-1300 Copyright 2007 Microsoft Outlook 2007 Calendar Objectives After completing
How To Use The Workstation Program On A Pc Or Mac Or Macbook Or Macintosh (Aero) With A Computer Or Ipa (A2) With An Ipa Or Ipad (A3) With The Powerpoint 2.
 With A Computer Or Ipa (A2) With An Ipa Or Ipad (A3) With The Powerpoint 2.") Mirasys NVR 6.1 User s Guide CONTENTS Contents... 2 Before you start... 3 Introduction... 6 Logging in... 9 User interface... 13 Navigator... 16 Cameras... 25 Video outputs... 41 Digital outputs... 46
Mirasys NVR 6.1 User s Guide CONTENTS Contents... 2 Before you start... 3 Introduction... 6 Logging in... 9 User interface... 13 Navigator... 16 Cameras... 25 Video outputs... 41 Digital outputs... 46
Select the name of the application and click on Force Quit.
 Mac and Windows Differences 1. Mouse buttons. The Mac mouse has a single button whereas a Windows mouse has two buttons. To display a contextual menu in a Mac environment, control+click on an object, unless
Access 2007 Creating Forms Table of Contents
 Access 2007 Creating Forms Table of Contents CREATING FORMS IN ACCESS 2007... 3 UNDERSTAND LAYOUT VIEW AND DESIGN VIEW... 3 LAYOUT VIEW... 3 DESIGN VIEW... 3 UNDERSTAND CONTROLS... 4 BOUND CONTROL... 4
Software Manual. For. MadgeTech 4 Data Logger Software
 Software Manual For MadgeTech 4 Data Logger Software Introduction 7 About MadgeTech, Inc... 8 Software Overview 9 Getting Started... 10 System Requirements...10 Software Installation: Installing the MadgeTech
Introduction to Mac Operating System: Snow Leopard
 Introduction to Mac Operating System: Snow Leopard Switching the Computer On 1. Press the round button on the back of the computer to turn the computer on. If the screen is black, but the lights are lit
Welcome to Bridgit @ CSU The Software Used To Data Conference.
 Welcome to Bridgit @ CSU The Software Used To Data Conference. Overview SMART Bridgit software is a client/server application that lets you share programs and information with anyone, anywhere in the world.
SQL Server 2005: Report Builder
 SQL Server 2005: Report Builder Table of Contents SQL Server 2005: Report Builder...3 Lab Setup...4 Exercise 1 Report Model Projects...5 Exercise 2 Create a Report using Report Builder...9 SQL Server 2005:
Rhythm Rascal Quick Start Guide Overview
 Rhythm Rascal Quick Start Guide Overview Rhythm Rascal is a virtual drum machine that can be programmed to play any style of music. It allows you to create unlimited patterns within a song, and each pattern
Applying a circular load. Immediate and consolidation settlement. Deformed contours. Query points and query lines. Graph query.
 Quick Start Tutorial 1-1 Quick Start Tutorial This quick start tutorial will cover some of the basic features of Settle3D. A circular load is applied to a single soil layer and settlements are examined.
Task Card #2 SMART Board: Notebook
 Task Card #2 SMART Board: Notebook Objectives: Participants will learn how to utilize the SMART Notebook. Table of Contents: Launching The SMART Notebook Page 1 Entering Text Page 1 Top Toolbar Page 2
1 ImageBrowser Software User Guide
 1 ImageBrowser Software User Guide Table of Contents (1/2) Chapter 1 Try It! ImageBrowser Chapter 2 What is ImageBrowser? Chapter 3 Starting ImageBrowser... 4 Downloading Images to Your Computer... 9 Printing
Mbox Basics Guide. Version 6.7 for LE Systems on Windows XP or Mac OS X. Digidesign
 Mbox Basics Guide Version 6.7 for LE Systems on Windows XP or Mac OS X Digidesign 2001 Junipero Serra Boulevard Daly City, CA 94014-3886 USA tel: 650 731 6300 fax: 650 731 6399 Technical Support (USA)
Internet Explorer 7. Getting Started The Internet Explorer Window. Tabs NEW! Working with the Tab Row. Microsoft QUICK Source
 Microsoft QUICK Source Internet Explorer 7 Getting Started The Internet Explorer Window u v w x y { Using the Command Bar The Command Bar contains shortcut buttons for Internet Explorer tools. To expand
HOW TO LINK AND PRESENT A 4D MODEL USING NAVISWORKS. Timo Hartmann [email protected]
 Technical Paper #1 HOW TO LINK AND PRESENT A 4D MODEL USING NAVISWORKS Timo Hartmann [email protected] COPYRIGHT 2009 VISICO Center, University of Twente [email protected] How to link and present
Help. Contents Back >>
 Contents Back >> Customizing Opening the Control Panel Control Panel Features Tabs Control Panel Lists Control Panel Buttons Customizing Your Tools Pen and Airbrush Tabs 2D Mouse and 4D Mouse Tabs Customizing
1 ImageBrowser Software Guide
 1 ImageBrowser Software Guide Table of Contents (1/2) Chapter 1 Try It! ImageBrowser Starting ImageBrowser -------------------------------------------------- 4 Importing Images to Your Computer ---------------------------------
Project Setup and Data Management Tutorial
 Project Setup and Heavy Construction Edition Version 1.20 Corporate Office Trimble Navigation Limited Engineering and Construction Division 5475 Kellenburger Road Dayton, Ohio 45424-1099 U.S.A. Phone: